
Introduction to PostgreSQL INSERT
The PostgreSQL INSERT statement tutorial is the perfect starting point for anyone learning how to manage data in relational databases. As one of the most frequently used SQL commands, the INSERT statement allows you to add new rows into a table with ease. In this guide, we’ll walk through beginner‑friendly examples that demonstrate how to insert single rows, perform PostgreSQL insert multiple rows examples, handle tricky cases like inserting a string with a single quote, and correctly add date values using the proper format. We’ll also explore the powerful RETURNING clause, which lets you instantly retrieve the last inserted ID or other values after an insert operation.
Each query is explained step‑by‑step so beginners can understand not just the syntax, but the reasoning behind it. By the end of this tutorial, you’ll have a strong foundation in PostgreSQL data insertion, ready to apply best practices and move confidently toward advanced features like inserting default values or copying data from another table using INSERT INTO … SELECT.
📚 Prerequisites for Beginners
If you are new to learning PostgreSQL, it’s important to build a strong foundation before diving into the PostgreSQL INSERT statement tutorial. We recommend starting with the basics of querying data:
- 👉 First, read the PostgreSQL SELECT clause explained with syntax, examples, and best practices. This will help you understand how to retrieve data from tables.
- 👉Next, master the PostgreSQL SELECT Clause with this high-performance querying masterclass. This will provide the essential foundation for retrieving and analyzing the data you are about to insert.
- 👉 Next, go through the PostgreSQL WHERE clause tutorial with examples. This will teach you how to filter rows effectively using conditions.
Once you are comfortable with SELECT and WHERE clauses, you’ll be ready to move on to PostgreSQL INSERT examples such as inserting single rows, multiple rows, handling strings with quotes, inserting date values, and using the RETURNING clause to get the last inserted ID.
🧩 Basic Syntax of PostgreSQL INSERT Statement
The official syntax for the PostgreSQL INSERT statement
INSERT INTO table_name (column1, column2, ...)
VALUES (value1, value2, ...);
Explanation:
- table_name: The name of the table where data will be inserted.
- column1, column2, …: The columns that will receive values.
- value1, value2, …: The actual data to be inserted, matching the column order.
👉 This syntax supports inserting one row at a time. For bulk inserts, you can add multiple value sets separated by commas.
🛠️ Script to Create a New PostgreSQL Database
Before inserting data, you need a database. Here’s how to create one:
-- Connect to PostgreSQL and run:
CREATE DATABASE company_data;
Explanation:
- This command creates a new database named company_data.
- You can connect to it using:
If you are practicing with the psql Command Line Tool for PostgreSQL, I recommend reviewing PostgreSQL SELECT Clause Explained and following Step 1: Connecting to PostgreSQL side‑by‑side to understand how to run scripts. In this tutorial, however, we will use the pgAdmin Query Tool to execute all queries.
When using the psql Command Line Tool for PostgreSQL, run the following query after you have successfully connected to your database.
\c company_dataConnecting to the New PostgreSQL Database in pgAdmin
After creating the new database named company_data, you must change your connection to work within this database. In pgAdmin, this can be done by right‑clicking on the company_data database and selecting Query Tool from the drop‑down menu, or by using the shortcut ALT + SHIFT + Q.
👉All subsequent PostgreSQL INSERT queries and examples provided in this tutorial should be executed in the context of the company_data database to ensure accurate results.
Script to CREATE TABLE employees Used in This Tutorial
We’ll use a table named employees for all examples. Here’s the creation script:
CREATE TABLE employees (
    id SERIAL PRIMARY KEY,
    name VARCHAR(100) NOT NULL,
    department VARCHAR(50),
    hire_date DATE
);
Explanation:
- id SERIAL PRIMARY KEY: Auto-incrementing unique identifier for each row.
- name VARCHAR(100) NOT NULL: Required text field for employee name.
- department VARCHAR(50): Optional text field for department name.
- hire_date DATE: Optional field to store the hiring date.
👉 This PostgreSQL INSERT Statement Tutorial supports below examples, including:
- PostgreSQL insert multiple rows example
- PostgreSQL insert string with single quote
- PostgreSQL insert date value
- PostgreSQL insert returning clause explained
Basic PostgreSQL INSERT Example (Explained for Beginners)
INSERT INTO employees (name, department, hire_date)
VALUES ('Alice Johnson', 'Finance', '2024-09-15');
Explanation:
- INSERT INTO employees → tells PostgreSQL which table to add data into.
- (name, department, hire_date) → specifies the columns that will receive values.
- VALUES (…) → provides the actual data.
- ‘Alice Johnson’ is a text string, ‘Finance’ is another string, and ‘2024-09-15’ is a date value.
👉 Beginners should always list column names to avoid confusion when table structures change.
PostgreSQL INSERT Multiple Rows Example
INSERT INTO employees (name, department, hire_date)
VALUES
('Bob Smith', 'IT', '2024-10-01'),
('Clara Lee', 'HR', '2024-11-12'),
('David Kim', 'Marketing', '2024-12-05');
Explanation:
- Instead of writing three separate INSERT statements, you can insert multiple rows at once.
- This is faster and more efficient, especially when working with large datasets.
PostgreSQL INSERT String with Single Quote
INSERT INTO employees (name, department)
VALUES ('O''Reilly', 'Publishing');
Explanation:
- Notice the double single quotes (”) around O’Reilly.
- PostgreSQL requires escaping single quotes to avoid syntax errors.
PostgreSQL INSERT Date Value
INSERT INTO employees (name, department, hire_date)
VALUES ('Emma Watson', 'Legal', '2024-12-15');
Explanation:
- Dates must be written in the format ‘YYYY-MM-DD’.
- PostgreSQL automatically stores this as a DATE type.
PostgreSQL INSERT Using RETURNING Clause to Get Last Inserted ID
INSERT INTO employees (name, department)
VALUES ('John Carter', 'Operations')
RETURNING id;
Explanation:
- The RETURNING clause tells PostgreSQL to give back the newly generated ID.
- This is useful when you need to reference the new row immediately (e.g., in applications or APIs).
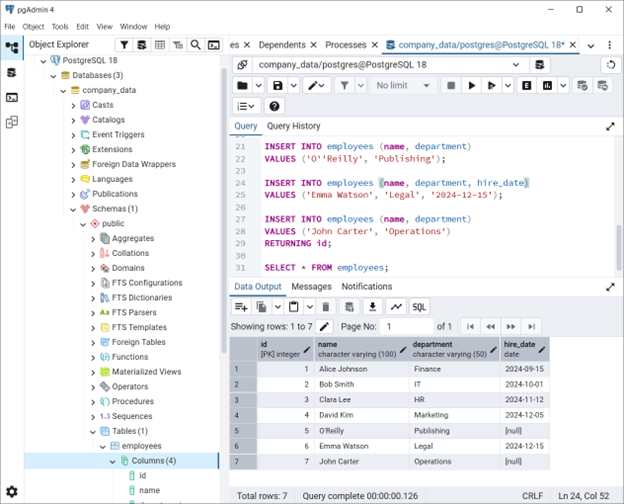
Viewing Data Inserted into the Employees Table in PostgreSQL
To verify records added using the PostgreSQL INSERT statement, run the following query:
SELECT * FROM employees;This command retrieves all rows from the employees table in company_name PostgreSQL database, allowing beginners to confirm inserted data, practice query execution, and understand how PostgreSQL SELECT statement examples work in real scenarios.
Best Practices for PostgreSQL INSERT
- ✅ Always specify column names → safer and clearer.
- ✅ Use bulk inserts → improves performance.
- ✅ Escape special characters → prevents errors.
- ✅ Leverage RETURNING clause → simplifies workflows.
- ✅ Validate data types → ensures consistency.
Conclusion
Mastering the PostgreSQL INSERT statement tutorial is the first step toward becoming confident with relational databases. By practicing PostgreSQL insert multiple rows examples, learning how to handle insert string with single quote, working with insert date values, and using the RETURNING clause to get the last inserted ID, beginners can quickly move from theory to real‑world application. These skills not only help in building robust applications but also prepare you for advanced features like PostgreSQL insert with default values and insert from another table using SELECT.
The key takeaway is simple: always specify column names, validate data types, and leverage bulk inserts for performance. With these best practices, you’ll avoid common pitfalls and ensure your database remains efficient and reliable.
By following this guide, you now have a strong foundation in PostgreSQL data insertion—ready to explore updates, deletes, and more advanced SQL operations.
Next Steps
- Practice with your own tables → Create a sample table and try inserting different data types.
- Learn PostgreSQL UPDATE and DELETE → Once you know how to insert, the next step is modifying and removing data.
- Explore advanced INSERT features → Such as INSERT ON CONFLICT (UPSERT) for handling duplicates.
- Optimize performance → Use transactions and bulk inserts for large datasets.
👉 By following these steps, you’ll move from beginner to intermediate PostgreSQL user quickly.
📌 Frequently Asked Questions (FAQs): PostgreSQL INSERT Statement
Question 1: How do I insert default values in PostgreSQL?
If a column has a default, omit it in the INSERT statement. PostgreSQL will use the default automatically.
Question 2: Can I insert data into all columns without listing them?
Yes, but it’s risky. Always specify column names to avoid schema mismatch errors.
Question 3: How do I insert data from another table?
Use INSERT INTO … SELECT to copy data from one table to another.
Question 4: How do I get the last inserted ID in PostgreSQL?
Use the RETURNING clause to fetch the ID immediately after insertion.
More PostgreSQL Articles and Tips
- PostgreSQL Row Count for All Tables: 7 Fastest Methods
- Mastering PostgreSQL Index-Only Scans: 40x Speed for Heavy Queries
- PostgreSQL Performance Tuning: The “Golden Ratios” for Memory Configuration
- PostgreSQL SELECT Clause: A Masterclass in High-Performance Querying & Best Practices
- PostgreSQL CREATE TABLE Tutorial with Examples and Best Practices
- PostgreSQL DELETE Statement Tutorial with Examples and Best Practices
- PostgreSQL UPDATE Statement Tutorial with Examples and Best Practices
- PostgreSQL INSERT Statement Tutorial | Multiple Rows, RETURNING Clause & Best Practices
- PostgreSQL WHERE Clause Tutorial with Examples

Add comment